Waste Bins Calendar - configuration
Where we left off
In the previous article I took you on a journey with a little blue trash bin, which helps to keep track of garbage collection dates. We finished it with a list of functional issues that stand in a way of making Waste Bins Calendar a product. Since then, I have come one step closer and that is what you are going to read about in this post 😊.

The Configuration
In the initial version, configuration settings were pretty much hardcoded. Although I used MAKO IoT’s ConfigurationService which reads & writes settings from/to files in flash (NVS), everything was set at startup with WriteDefault method:
1
2
3
4
5
6
7
8
9
10
11
12
13
14
15
16
17
18
19
20
21
22
23
24
25
26
27
28
29
30
31
.AddConfiguration(cfg =>
{
    cfg.WriteDefault(SchedulerConfig.SectionName, new SchedulerConfig
    {
        Tasks = new[]
        {
            new SchedulerTaskConfig { TaskId = nameof(ShowBinsScheduleTask), IntervalMs = 600000 }
        }
    });

    cfg.WriteDefault(WiFiConfig.SectionName, new WiFiConfig
    {
        Ssid = "My WiFi Network",
        Password = "SecretWifiPassword",
    });

    cfg.WriteDefault(WasteBinsCalendarConfig.SectionName, new WasteBinsCalendarConfig
    {
        CalendarUrl = "http://my-calendar.com/trash-collection",
        Timezone = "CET-1CEST,M3.5.0,M10.5.0/3"
        BinsNames = new()
        {
            { "mixed", "Black" },
            { "compost", "Brown" },
            { "plastic", "Yellow" },
            { "glass", "Green" },
            { "paper", "Blue" },
            { "batteries", "Red" }
        }
    });
})
This of course makes sense for system settings and default values, but there was no way of changing, for example, Wi-Fi credentials once code had been deployed to the device.
How to input anything
How can you input anything to a device with no screen or keyboard? You need another device – a smartphone or a PC. That could be connected by USB cable, Wi-Fi, or Bluetooth. A common solution in IoT world is Wi-Fi access point exposed by device, to which you connect the PC or smartphone and access configuration website on the device. Once done, the access point would be disabled, and the device enters normal operation mode (connects to your configured Wi-Fi network etc.).
To make this work I needed several things:
- Access Point mode on Wi-Fi network interface of my ESP32.
- DHCP server (to assign an IP address to the external device).
- A web server.
- Physical button to launch configuration mode.
Configuration mode in and out
MAKO IoT provides Configuration Manager library which handles modes switching (configuration vs. normal operations) and reboots in between. Once you add it in DeviceBuilder:
1
.AddConfigurationManager()
it does several things. It registers a Device Start Behavior, that is a piece of code executed on device startup. In here, it determines which mode the device currently is: if it is configuration mode - startup sequence is interrupted, and Configuration Manager launches everything required to expose the configuration website: AP, DHCP and Web Server.
Configuration Manager also provides an event, which once published through Mediator, launches configuration mode and a method for getting back to normal operations mode. This is all to be wired-up in Device Builder:
1
2
3
4
5
6
7
8
9
10
11
12
13
14
15
16
17
18
.AddConfiguration(cfg =>
{
    //Wi-Fi Access Point configuration
    cfg.WriteDefault(WiFiAPConfig.SectionName, new WiFiAPConfig
    {
        Ssid = "WBC device",
        Password = "makoiotdevice",
    });
})
.AddMediator(o =>
{
    //Event which turns on configuration mode
    o.AddSubscriber(typeof(ConfigModeToggleEvent), typeof(IConfigManager));
})

//This component manages Wi-Fi interface switching between AP and STAtion
.AddWiFiInterfaceManager()
.AddConfigurationManager()
Now to launch the ConfigModeToggleEvent I needed a button, so here it is:
1
2
3
4
5
6
7
8
9
10
11
12
13
14
15
public class ConfigButton
{
    private readonly IMediator _mediator;
    public ConfigButton(IMediator mediator, ILog logger)
    {
        _mediator = mediator;
        var configModeButton = new GpioButton(buttonPin: 13);
        configModeButton.Press += ConfigModeButton_Press;
    }

    private void ConfigModeButton_Press(object sender, System.EventArgs e)
    {
        _mediator.Publish(new ConfigModeToggleEvent { Mode = SwitchMode.Toggle });
    }
}
The Web Server
Having the configuration mode sorted, I moved to implementing the configuration process itself. This has gone through several iterations before settling on the solution, which gives the best user experience 😊
Generic API + Frontend
MAKO IoT provides a generic way of configuring application settings. The main concept behind it is this:
- Decorate your config classes with metadata attributes, set labels & types for all fields.
- Launch a tool which reads those attributes and generates metadata strings.
- Put the metadata strings into application code, so they are exposed via configuration API on the device.
- Use a generic web application (Blazor WebAssembly) to read the metadata and configure settings using the device’s API.
This is a fast way to get it going however there are several user experience drawbacks. The front-end application is hosted externally (it is too large to fit onto device flash memory). This means that user must first load the front-end from a public website and then switch to the device’s AP network. This seems bearable, but then another issue hits. If the front-end is hosted on HTTPS it won’t be able to connect to device’s API, which is on HTTP. Modern web browsers block so-called mixed content unless you explicitly change their security configuration. As a user I’d be very unhappy to do so! Besides that, the metadata strings consume device’s memory, as they are loaded to RAM alongside application code. So that approach was a no-go.
Plain ol’ HTML form
I decided to go for dedicated set of HTML pages. I needed these pages to be as compact as possible, yet with a decent look & feel. I used Milligram CSS, which is only 2kb when gzip-ped. By the way, as modern browsers support gzip compression on the fly, compressing all “static” files upfront saves lot of memory!
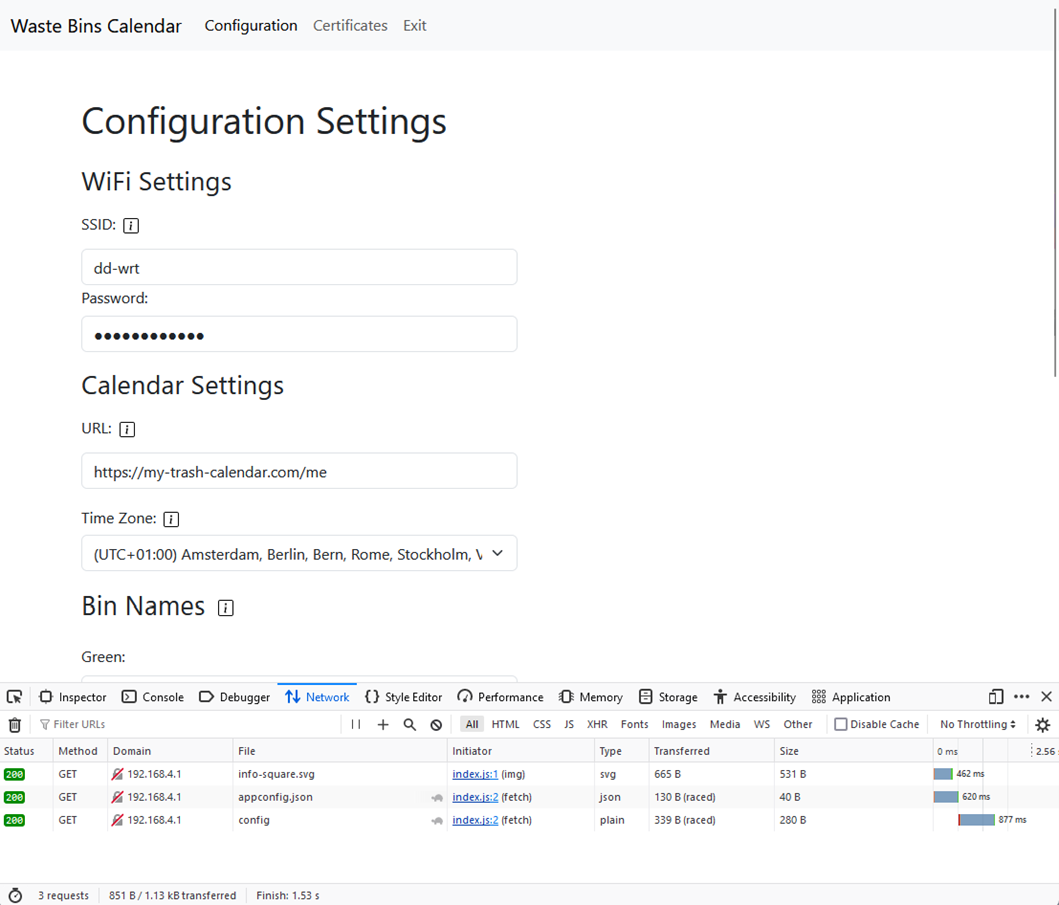
I started with a simple HTML form, where you could input Wi-Fi credentials, calendar URL, time zone, name for each bin and upload an HTTPS certificate. Another page was Exit.html which just presented information about exiting configuration mode and rebooting device. I needed Index.html (the form page) to have some dynamic content - fill in configuration settings read from device. I achieved this by simple find-and-replace tokens in curly braces - { }.
Form parser
NanoFramework’s – or MAKO’s Web Server does provide simple logic to handle HTTP requests and responses. You can write and read raw contents. But in order to get submitted values I had to parse the HTTP request myself.
HTML form encodings come generally in two flavours: url-encoded or multipart. The first one is just a chain of key-value pairs, separated by &. It is pretty simple to parse with a handful of String.Split-s. But when it comes to uploading a file, browsers switch to the multipart, which is a different story. Form’s fields are separated by a string called boundary, which is submitted as part of request header (content-type). You need to read the request line by line and every time you reach the boundary it means new form field has begun. Uploaded file is just another form field.
Given limited amount of RAM, the first challenge with parsing multipart form was doing it without loading the whole request into memory. For that I used StreamReader class to read InputStream from HttpListenerRequest object line by line. Getting regular <input> fields’ values didn’t pose a challenge, some Split-s and skipping empty lines. However, when it came to uploaded file, I couldn’t just put the whole contents into a string (limited RAM…). Instead, I implemented a delegate which was invoked once the parser reached file field. Passing StreamReader object across allowed logic inside the delegate to directly read & write contents to file line by line. Of course, the delegate had to look out for the boundary and when reached – stop reading and exit.
1
public delegate string FileUploadDelegate(string fieldName, string fileName, StreamReader contentsReader, string boundary);
Yet another issue arisen with this approach. When StreamReader is disposed it disposes underlying Stream. In my case it was disposing network socket object, so any attempt to send HTTP response back resulted in an error. Implementing slightly modified reader class turned to be successful workaround:
1
2
3
4
5
6
7
8
9
10
11
public class RequestStreamReader : StreamReader
{
    public RequestStreamReader(Stream stream) : base(stream)
    {
    }

    protected override void Dispose(bool disposing)
    {
        base.Dispose(false);
    }
}
More memory issues…
NanoFramework provides a way of storing contents in resources. It works similarly to resources in .NET framework – whatever you put there is compiled into assembly and loaded in runtime. So here I was again with the limited RAM – as my HTML grew, I started getting out of memory exceptions. For my form I wanted a drop-down field with all the world’s time zones, so users could just select the city they live in instead of figuring out POSIX string for their time zone. Unfortunately, this was too big…
Partition flashing to the rescue
How to bypass loading the HTML contents to RAM? Read it directly from flash and send it to HttpResponse stream. But how to get it onto the flash in the first place? NanoFramwork uses special flash region for its config partition. This is set up with ESP32 partition table and by default it is 256kB and has SPIFFS file system. ESP IDF comes with tools for creating SPIFFS image (spiffsgen) and writing the image to flash on ESP32 (parttool). There is however a catch – to be able to read the image contents from NanoFramework app on the device, the image must be created with the exact set of parameters as NanoFramework expects (these are configured in sdkconfig files for specifc target like here). If not – NF will assume that the config partition is invalid and format it at boot time. That took me a while to figure out, but eventually I was able to get all my files across! 😊
Here is how to do it. You need to have python and ESP IDF installed. You also need %IDF_PATH% system variable pointing at your ESP IDF location. Below is a batch file that creates image from FileSystem folder and uploads it onto device. Set port variable to the COM port of your device.
1
2
3
4
set port=COM3
python %idf_path%\components\spiffs\spiffsgen.py --page-size 512 --obj-name-len 256 --use-magic --use-magic-len 262144 FileSystem %tmp%\config_image.bin
python %idf_path%\components\partition_table\parttool.py -p %port% write_partition -n config --input %tmp%\config_image.bin
del %tmp%\config_image.bin
ASP.NET – microcontroller style
If you are old enough to remember first server-side pre-processors like PHP or ASP (or even CGI scripts) – this is more-less what I ended up with. You can find building blocks in MAKO IoT WebServer repository & nuget package. Here’s the recipe:
- Ensure you have python and ESP IDF installed and %IDF_PATH% environment variable points to the IDF folder.
- Create FileSystem folder in your project and place everything you need to flash to the config partition (HTML, CSS, etc.) there.
- Create Controllers folder and implement controllers for your server:
- For HTML pages with pre-processing (parameters, form) inherit from WebControllerBase class.
- For static files (CSS, JS, static HTML, images) inherit from StaticWebControllerBase class.
- (Optionally) Compress static files to GZIP format. You can use 7-Zip for that. Make sure compressed file’s name has .gz suffix, e.g. style.css -> style.css.gz
- Ensure your device is connected and verify its COM port name. Launch FlashConfig.bat (modify port variable, if needed)
In HTML for pre-processing, you can place parameters in curly brackets e.g.:
1
<input type="url" name="calendarUrl" id="calendarUrl" value="{calendarUrl}" />
These parameters will be gathered in HtmlParams hashtable and you will be able to set their values there:
1
HtmlParams.AddOrUpdate("calendarUrl", config.CalendarUrl);
Here is an example of a pre-processed HTML controller:
1
2
3
4
5
6
7
8
9
10
11
12
13
14
15
16
17
18
19
20
21
22
23
24
25
26
27
28
29
30
31
32
33
34
35
36
37
38
39
40
41
42
43
44
45
46
47
48
49
50
51
52
53
54
55
56
57
58
59
60
61
62
63
64
public class IndexController : ControllerBase
{
    public IndexController(ILog logger) : base("I:\\index.html", logger){}

    [Route("")]
    [Route("index.html")]
    [Method("GET")]
    public void Get(WebServerEventArgs e)
    {
        //set parameters values here
        HtmlParams.AddOrUpdate("calendarUrl", "https://my-calendar.com");

        [...]

        Render(e.Context.Response, false);
    }

    [Route("")]
    [Route("index.html")]
    [Method("POST")]
    public void Post(WebServerEventArgs e)
    {
        //parse submitted form, pass delegate to save file if the form contains file upload field
        ParseForm(e.Context.Request, (fieldName, fileName, reader, boundary) =>
        {
            if (fieldName == "myFile")
                return SaveFile(reader, boundary,  "I:\\myFile.txt");

            return reader.ReadLine();
        });

        //read submitted values from Form
        var calendarUrl = (string)Form["calendarUrl"];

        [...]

        Render(e.Context.Response, true); //copyFormToParams will copy submitted values so they appear in form fields
    }

    //if your form has no file upload input, you can omit this method
    private string SaveFile(StreamReader reader, string boundary, string fileName)
    {
        //skip empty lines
        string line;
        do
        {
            line = reader.ReadLine();
         } while (line == "");

        if (line == null || line.StartsWith(boundary))
            return line;

        using var writer = StreamWriter(File.OpenWrite(fileName));
        while (line != null && !line.StartsWith(boundary))
        {
            writer.WriteLine(line);
            line = reader.ReadLine();
        }
        writer.Close();
        Logger.Trace($"File {fileName} saved");

        return line;
    }
}
Here is an example of a static files’ controller:
1
2
3
4
5
6
7
8
9
10
11
12
13
14
15
16
public class StaticWebFilesController : StaticWebControllerBase
{
    [Route("index.css")]
    [Method("GET")]
    public void GetCss(WebServerEventArgs e)
    {
        Render(e.Context.Response, "index.css");
    }

    [Route("favicon.ico")]
    [Method("GET")]
    public void GetFavicon(WebServerEventArgs e)
    {
        Render(e.Context.Response, "favicon.ico");
    }
}
The Render method will first look for a gzip-ped file (e.g. index.css.gz), if it’s not there it will send down the plain version.
Power upside down
Let’s take a step back and notice an interesting fact. Since the beginning of all sorts of server-pre-processed web pages (cgi, php, asp, etc.) it has been generally assumed that server is much more resourceful than client. All heavy lifting was initially done on server side, then it started shifting towards clients as PCs and smartphones became much more powerful. In our case we are on the very opposite extreme – our server is a tiny microcontroller device with order-of-magnitude less resources than its client (either PC or smartphone). So logically we should move as much processing as possible to the client.
This looked like the most effective approach: implement front-end app with some lightweight JavaScript framework, serve it as a bunch of gzip-ped static files and use REST API to handle data reads and updates.
The Front End
The main criterion of front-end framework choice was size. According to this comparison, Preact was the most lightweight one. To be honest, I haven’t got much experience in any front-end technology, ReactJS being the closest. Fortunately, Preact seems to be very similar. As I had a lot of doubt in my front-end skills, I asked ChatGPT for help and luckily it knew Preact! Together we developed the app in two evenings 😊
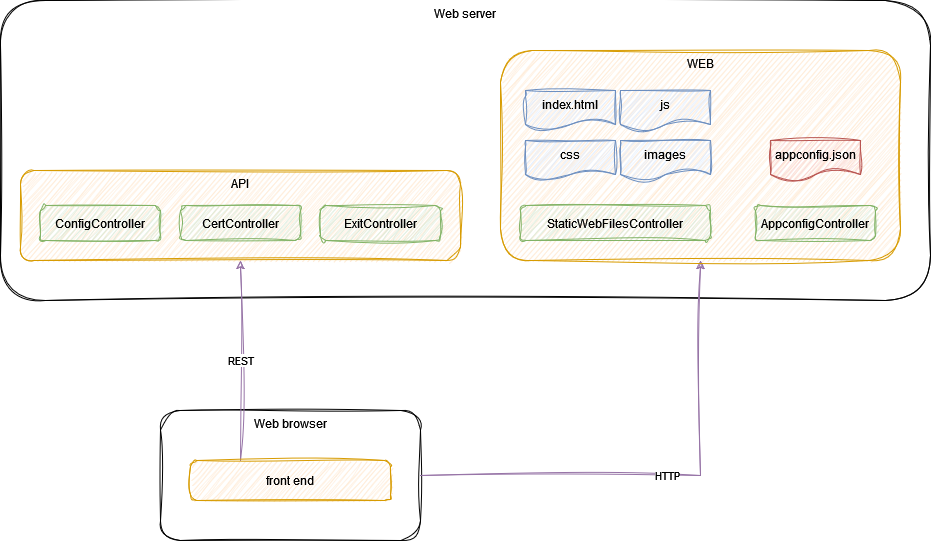
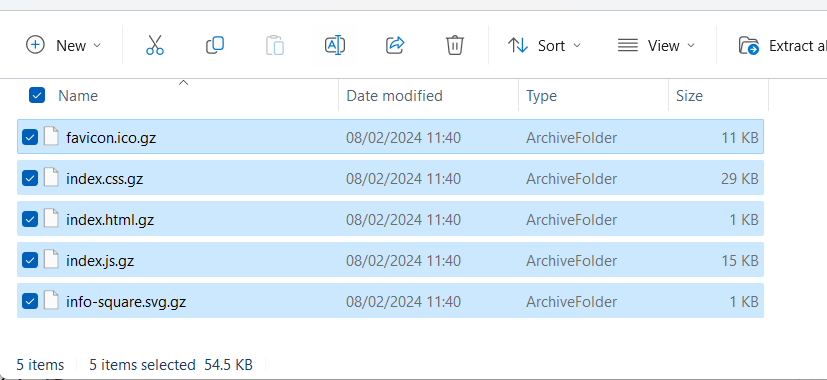
The app consists of 5 static files (html, css, js and icons) and a configuration file, with URL to the REST API. I compressed those static files and exposed them with StaticWebFilesController. For appconfig.json I created dedicated AppconfigController, which retrieves web server’s address from device’s configuration and makes up appconfig.json on the fly.
For testing the front-end I also created ASP.NET API project which mocks the device’s REST API.
The API
Next, I moved onto device’s REST API. I grouped my functionality in three controllers:
- ConfigController – responsible of reading and updating configuration settings,
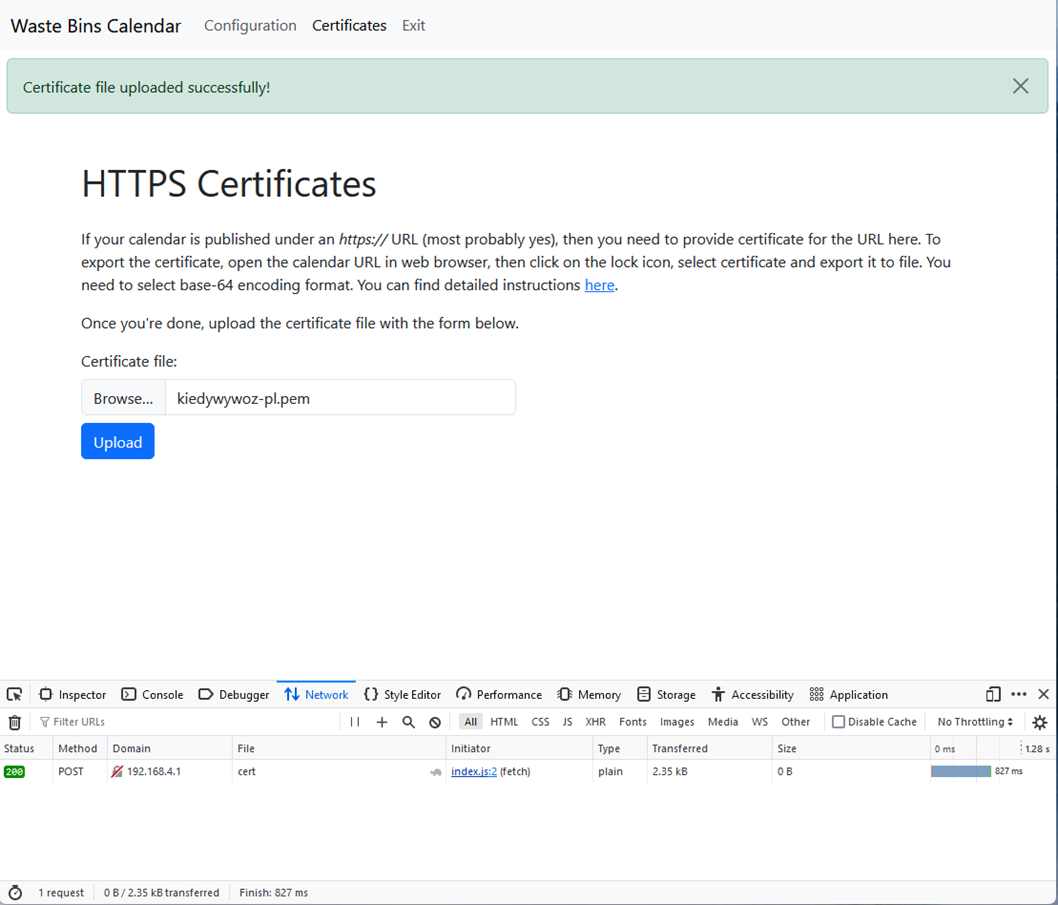
- CertController – handling upload of HTTPS certificate file
- ExitController – this is what you call when you’re done configuring and want to exit configuration mode.
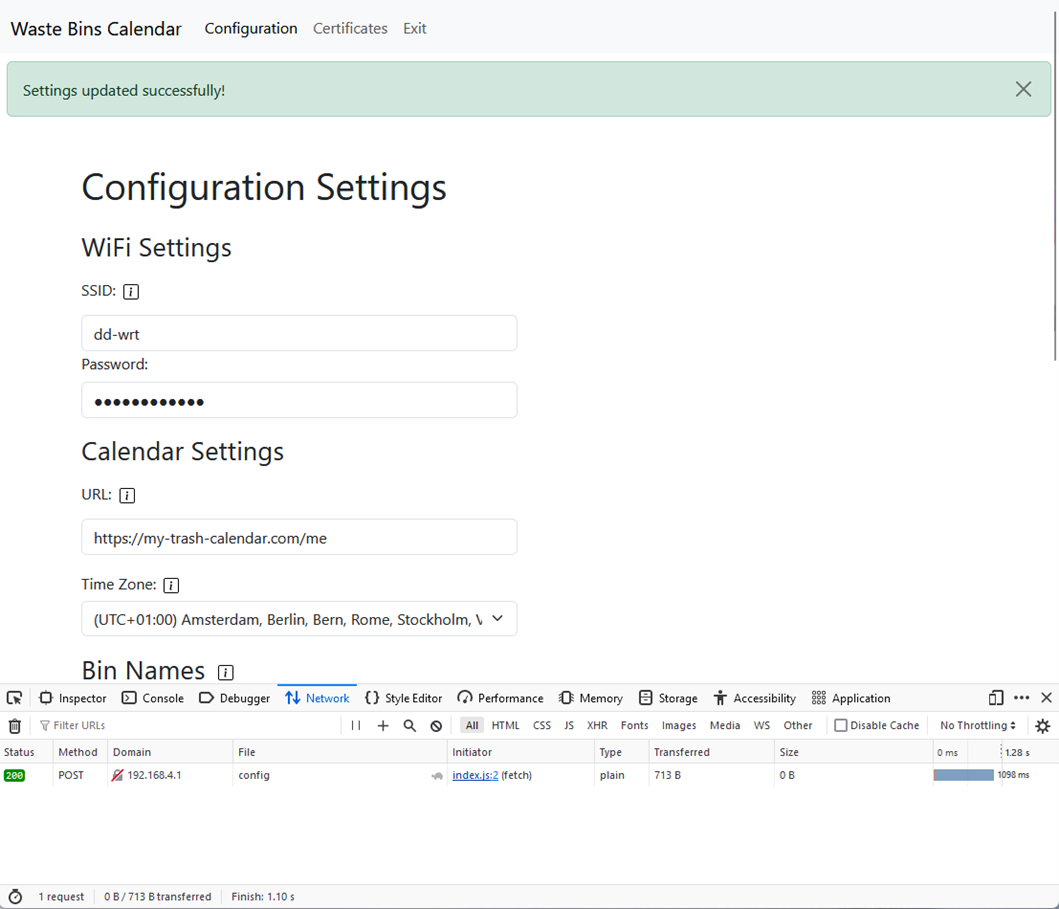
The front-end naturally handles form data in JSON format, so that’s what I used on my back-end controller as well. I created a bunch of DTO classes which mimic the JSON data structure and employed NanoFramework JSON library to do serialization and deserialization. The DTO classes live in a shared project and so they can be used in both the NanoFramework code (web server) and .NET test server.

File upload is done via HTML form field, so in the CertController I mostly re-used the multipart form parsing logic implemented earlier. This made its way to FileUploadApiControllerBase in MAKO IoT WebServer library.
The Benchmarks
Loading speed, or put differently: request time, has direct impact on UX, the shorter the better. Loading static (gzip-ped) resources was fast, in 1 – 2 second’s range. Index.html with pre-processing however was taking over 5 seconds to load. This makes a lot of sense if we look at the executing logic: read file contents line-by-line, decode bytes into UTF-8 string, perform find & replace, and finally encode into bytes and write to HTTP response stream. Even after several code optimizations I could not get the time below 5 seconds.
On the other hand, the front-end & API approach was a real game-changer. All resources, except appconfig.json (which was really small), were static. I had them gzip-ped and streamed directly from file system through a memory buffer, without any processing on the device. Front-end with all artefacts loaded in less than 2 seconds!

API calls: loading and updating settings, and certificate file upload were fast too – all below 2 seconds.
All front-end artefacts took about 55kB of the config partition, the largest file being Bootstrap CSS. Replacing Bootstrap with some lightweight CSS could make that even less.
One Step Closer
While I was polishing the solution and merging changes to the main branch, I thought this is one step towards a product. This little trash bin could potentially be manufactured, loaded with software, and handed over to users who would be able to configure and use it. I would imagine they could have hard time exporting HTTPS certificate from their calendar provider website, as this process is not intuitive. Still there is no possibility to update software via Wi-Fi, without USB connection. But would the Waste Bins Calendar be usable in its current form? There is only one way to find out 😊