Waste Bins Calendar
The Fairy Tale
Once upon a time, in a land far, far away, there lived a beautiful princess named Isabella. She resided in a magnificent castle atop a lush green hill. The castle was known for its grandeur, with tall towers, gleaming turrets, and lush gardens, making it the envy of all neighbouring kingdoms. But there was a peculiar problem that plagued Princess Isabella and her beloved castle.
The issue was none other than the ever-growing pile of trash. The castle staff, despite their dedication, often forgot to put out the trash bins on collection days. As a result, the bins inside the castle filled up quickly, and the piles of garbage began to overflow, creating a rather unpleasant atmosphere within the majestic walls.
Princess Isabella, who was known for her kindness and resourcefulness, decided it was time to take matters into her own hands. She couldn’t bear to see her beloved castle marred by the unsightly heaps of rubbish. So, she decided to seek the assistance of the kingdom’s most revered and wise wizard, Archibald the Enchanter.
One bright and sunny morning, she made her way to the enchanting forest on the outskirts of the kingdom, where Archibald’s mystical cottage was nestled. Princess Isabella knocked on the weathered door of Archibald’s cottage, and after a few moments, the door creaked open. A tall, bearded wizard with twinkling eyes and a long robe greeted her. “Princess Isabella,” he said with a warm smile, “What brings you to my humble abode today?”
Isabella curtsied gracefully and explained the problem that had been plaguing her castle. She told Archibald of the overflowing trash, and the distress it had caused her.
The wise wizard listened attentively, stroking his beard thoughtfully. After a moment, he said, “Fear not, Princess Isabella, for I have a solution. I shall enchant your trash bins to have a voice of their own, and they will remind your servants when it’s time to take them out for collection. This way, your castle will remain pristine and beautiful.”
Princess Isabella’s eyes sparkled with gratitude, and she thanked Archibald profusely. With a wave of his wand and a few incantations, he cast the enchantment on the trash bins.
As the days passed, the once-silent trash bins in the castle came to life, speaking in cheerful voices when trash collection day neared. They would remind the servants with gentle, melodic chimes, ensuring that the bins were placed outside on time. The castle staff, enchanted by this magical assistance, no longer forgot their duty.
The castle was soon free from the unsightly heaps of rubbish, and the atmosphere was once again filled with the sweet scent of blooming flowers. Princess Isabella and her castle regained their pristine beauty and lived happily ever after.
The Functional
Although the above story is entirely made up by AI, it represents a real-life problem. Just like Archibald I was thinking how to make such an “enchanted” trash bin. Instead of gentle, melodic chimes it would remind of collection day with a light. The light colour would indicate, which bin is about to be collected (we have five bins in total: paper, plastic, glass, bio and mixed). The light should also indicate whether the bin collection day is today or tomorrow.
Unlike in the 12th century, nowadays trash collection company publishes their schedule on the web in downloadable iCalendar file. I could use an ESP32 with RGB LED to get the data and display appropriate colour, like this:
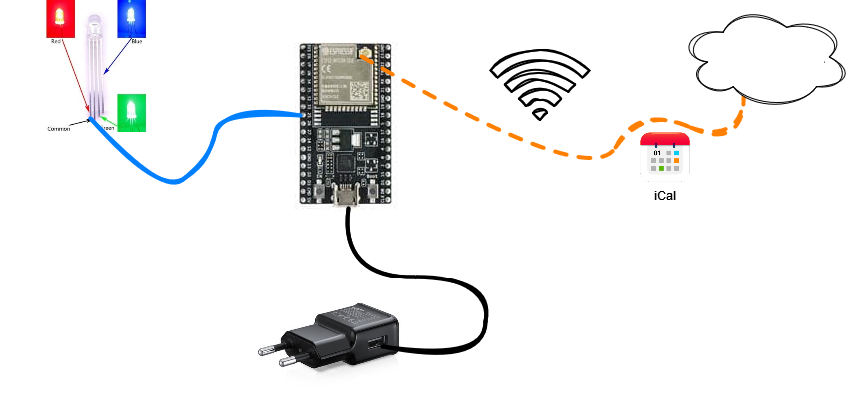
Now I had two functional issues to sort out. How to handle multiple bins per day (say, paper – blue and glass – green) with a single LED? And how to differentiate between “today” and “tomorrow”? Apart from those, I would like to know when the device is updating its data or when error occurs. All these thoughts eventually resulted in this design:
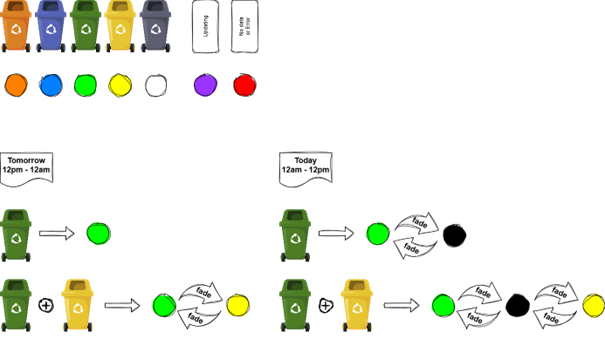
Each of the five bins would be represented by a colour:
- BIO (brown) – “brownish” orange
- Paper (blue) – blue
- Glass (green) – green
- Plastic & metal (yellow) – yellow
- Mixed (black) – white (it is so hard to find LED capable of displaying black colour😉)
Between noon and midnight, the device would show bins to be collected on the following day. After midnight until noon, it would show bins for today (if someone is up early, there would still be a chance of getting bins out before garbage truck arrives). “Tomorrow” would be indicated by still light or direct fade between colours, in case of multiple bins. For “today”, colours would fade in and out to black.
The Hardware
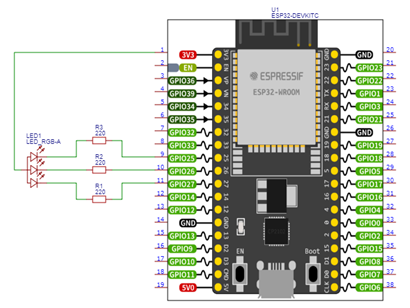
Hardware-wise, ESP32 had all what was needed: Wi-Fi, native support of TLS/HTTPS, PWM to control brightness of each R, G and B channels on the LED. Schematic turned out to be simple:
The Software
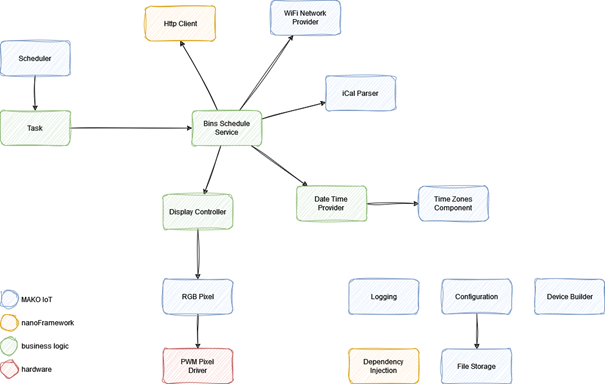
Now is when it gets interesting! I split the system into several modules:
- The Main Service – orchestrates everything.
- Scheduler – executes some logic at given interval.
- API Client – downloads data from API via Wi-Fi.
- Data parser – extracts information about bins schedule from iCalendar file.
- Date & Time Provider – provides local date & time considering time zone (and daylight saving time).
- Display Controller – controls colour changes on LED.
- Configuration & flash storage – settings need to live somewhere…
- RGB LED Driver – translates colour into PWM signals for LED.
There were a few meta-requirements as well, such as:
- Adhering to SOLID principles & clean code, as much as possible.
- Testability – ideally all logic should be testable without hardware.
- Logging – saves a lot of time when fixing bugs.
- Debugging – also saves time 😊
The Tech Stack
Given all requirements (and my personal preference for .NET 😉) I decided to go for .NET NanoFramework and MAKO IoT. Eventually some of the modules have been backported to MAKO IoT and the whole project is now part of the Samples library.
This is how the high-level architecture looks like:
Let’s extract some data!
If you look at iCalendar format specification, there is a lot going on. Fortunately, what I needed to handle was just a flat list of VEVENT objects and basic values like date, summary etc. It turned out there is no iCalendar parser for nanoFramework, so I went into looking for a .NET implementation which would be easy to port.
NanoFramework is mostly compatible with the “big” .NET with several simplifications as – obviously – it needs to run on much less powerful devices. One of the biggest shortcomings is the lack of generics, however this may be quite easily overcome by letting go of strong typing in favour of an old friend object type and using concrete delegate classes where needed.
Unfortunately, all .NET open-source parsers I found were either too bulky themselves or consuming too much memory. So, I decided to implement a minimal parser which just fulfil my requirements and nothing more! Generally, when you develop code which is supposed to run on such a limited device, you need to thoughtfully use resources like CPU, threads, and RAM. My ESP32 module had only 520KB of RAM that needed to fit nanoFramework CLR, my code and data. Keeping this in mind I made the parser read line after line from input stream. This way I could process the input text directly as it flows through http response content instead of storing it whole in memory upfront. Another trick was to avoid storing found objects inside the parser but to call a delegate whenever object is found.
What I like about nanoFramework a lot is the fact, that it comes with a test framework. The framework integrates directly into Visual Studio and gives the very same experience as developing and running unit tests with the “big” .NET. Tests can be run either on physical device or a PC port of nanoFramework CLR. The latter option gives possibility to test your code on your development PC or CI pipeline, just like a regular .NET application. I guess I do not need to explain how much this speeds up bug-fixing! I could just feed the parser with real data and check results.
Finally, the parser made its way to ICalParser MAKO IoT repository and a nuget package.
Adding colours
Ability to test as much as possible (ideally whole business logic) without hardware was a must-have for me. To achieve it, I needed to abstract all hardware I intended to use. Fortunately, there was just a LED and its abstraction turned out to be simple:
1
2
3
4
5
6
7
8
9
10
11
/// <summary>
/// Interface for hardware driver to set pixel color
/// </summary>
public interface IPixelDriver
{
    /// <summary>
    /// Sets hardware pixel color
    /// </summary>
    /// <param name="color">The color</param>
    void SetPixel(Color color);
}
Having that out of the way, I got colour transitions and fades working and testable. Later I packed it up into MAKO IoT LED library. It was time to bring colour changes to another level…
A-syncing without async
Although nanoFramework does not provide us with convenient async / await style, it facilitates thread manipulation capabilities with Thread class. There are some quirks though to bear in mind. ESP32 has two cores. One is delegated to handling networking by default. This leaves us with the other core for code execution. Practically having multiple threads on a single core gives rather poor parallel execution experience but with a little bit of thought it makes pretty good impression. It boils down to switching threads while one of them is “sleeping”. If you want thread pool to switch to another (waiting) thread in particular place of the code, you need to put Thread.Sleep() there. But let’s go back to the colours.
I wanted colours to change dynamically, transition and fade. This of course had to be asynchronous, so other threads would manage things like data updates. Every display “effect” was in general a loop with colour transitions. Delays (or “sleeps”) were both inside transitions and between them, which made the opportunities to switch threads, if needed:
1
2
3
4
5
6
7
8
9
10
while (!_cancellationToken.IsCancellationRequested)
{
    for (int i = 0; i < bins.Length
	&& !_cancellationToken.IsCancellationRequested; i++)
    {
        _pixel.Transition(bins[i], _cancellationToken);
        _cancellationToken.WaitHandle.WaitOne(1000, false);
        _pixel.Transition(new Color(0, 0, 0), _cancellationToken);
    }
}
Every display function needed a way to be interrupted, and that was done by employing CancellationToken. And this is how display function is switched on and off:
1
2
3
4
5
6
7
8
9
10
11
12
13
14
15
16
17
18
19
20
21
private void SwitchDisplay(Action displayMethod)
{
    Cancel();

    _displayTokenSource = new CancellationTokenSource();
    _cancellationToken = _displayTokenSource.Token;
    _displayThread = new Thread(() => displayMethod());
    _displayThread.Start();
    _logger.LogDebug("New display method started");
}

private void Cancel()
{
    if (_displayThread != null)
    {
        _logger.LogDebug("Cancelling current display method");
        _displayTokenSource.Cancel();
        Thread.Sleep(100);
        _displayThread = null;
    }
}
Check out DisplayController class.
On Time
Getting current time is trivial: DateTime.Now… or is it not? Let us get down into hardware for a moment. PCs, servers, laptops – they all have RTC modules, which keeps date and time and have backup batteries to keep running even when power is down. On top of that, operating system manages information about time zones and DST (daylight saving time) settings and provides accurate local date and time to running software. Moreover, nowadays local computer clock is synchronised over internet with NTP servers – everything behind the scenes. What about ESP32? No RTC, no time zones support, but hey! nanoFramework does automatic time synchronization when network connection is established. We get UTC time in DateTime.UtcNow. Would UTC be good enough? For those living in UK or EU probably yes, as local time offset would be up to two hours. But not for other regions.
The simplest solution would be to add a configuration setting like “local time offset” so user could decide when their device switches from “tomorrow” to “today”. However, I did not find that satisfying enough in UX terms. I needed a component which takes UTC, time zone information (UTC offset, DST offset, DST rules) and returns local date & time. Unfortunately, nothing off the shelf for nanoFramework…
Starting from input - all necessary time zone information may be encoded in POSIX format. This can be parsed with a regular expression (yes, we have RegEx in nanoFramework!). A POSIX time zone string consists of (up to) four parts: standard time name and offset, DST name and offset, DST start rule, DST end rule. First two are straightforward, rules need more attention. As different countries (or regions) define their DST start and end in different ways, rules come in two variations: fixed day of the year, or nth occurrence of weekday in month. The latter resolves to different date depending on year. I decided to abstract these innerworkings of date calculation with an interface:
1
2
3
4
5
6
7
8
9
10
11
12
13
14
15
16
/// <summary>
/// Represents a day & time in any year.
/// </summary>
public interface ICalendarDate
{
    /// <summary>
    /// Kind of the date
    /// </summary>
    DateKind Kind { get; }
    /// <summary>
    /// Calculates specific date in the given year.
    /// </summary>
    /// <param name="year">The year</param>
    /// <returns>Date and time</returns>
    DateTime GetDate(int year);
}
DateKind property indicates whether the date & time is UTC or local (note that DST rules may be stated in either of those). Two implementations, for each of the variations are: FixedDate and FloatingDate. Now I was able to implement TimeZone class, which calculates local time given all the time zone information like this:
1
2
3
4
5
6
7
8
9
10
11
12
13
14
15
16
17
18
19
20
21
22
23
24
25
26
27
28
29
30
31
32
33
/// <summary>
/// Gets local time.
/// </summary>
/// <param name="utcDateTime">UTC date and time</param>
/// <returns>Local date and time</returns>
public DateTime GetLocalTime(DateTime utcDateTime)
{
    return utcDateTime.Add(IsDst(utcDateTime)
	    ? DstUtcOffset : StandardUtcOffset);
}

/// <summary>
/// Returns [true] if DST is observed at given date and time.
/// </summary>
/// <param name="utcDateTime">UTC date and time</param>
/// <returns>[true] if DST is observed, otherwise [false]</returns>
public bool IsDst(DateTime utcDateTime)
{
    if (!HasDst)
        return false;

    var dstStarts = DstStarts.Kind == DateKind.Utc
        ? DstStarts.GetDate(utcDateTime.Year)
        : DstStarts.GetDate(utcDateTime.Year) - StandardUtcOffset;

    var dstEnds = DstEnds.Kind == DateKind.Utc
        ? DstEnds.GetDate(utcDateTime.Year)
        : DstEnds.GetDate(utcDateTime.Year) - DstUtcOffset;

    return dstEnds < dstStarts //DST spans new year
        ? utcDateTime >= dstStarts || utcDateTime < dstEnds
        : utcDateTime >= dstStarts && utcDateTime < dstEnds;
}
The code eventually made its way to MAKO IoT TimeZones library and is available on nuget.org.
The last thing on the time topic was to wrap this all around IDateTimeProvider interface. That serves two purposes. First, it encapsulates operations required to calculate local time. Second, it enables testing of time-dependent logic – by mocking the provider you can set whichever time you need in your tests to verify certain behaviour.
The Service
Having all sub-components in place I finally could focus on BinsScheduleService class, which does the actual work: connects to API, downloads & parses data, and sets the display. For downloading I used nanoFramework’s HttpClient. Just in case of any transient faults (which may happen during network operations) I wrapped the call in Invoker.Retry. This small utility provides a graceful way of re-executing a piece of code in case of exception. By the way, if you have not seen it already – check out Polly which provides many useful transient fault handling strategies for .NET.
One thing to keep in mind when calling HTTPS URLs from devices like ESP32 is the necessity to provide certificate to authenticate the domain. This is something we usually take for granted on PCs and servers as their operating systems keep lists of trusted certificate authorities and validate websites’ certificates behind the scenes. On ESP32 we can also benefit from automatic certificate validation with nanoFramework backed by mbedTLS, however we need to supply the certificate(s) we trust ourselves. In my case I just loaded the certificate from configuration:
1
2
3
4
5
if (!String.IsNullOrEmpty(_config.ServiceCertificate))
{
    _httpClient.HttpsAuthentCert =
	new X509Certificate(_config.ServiceCertificate);
}
Let us go back for a moment to data itself. Internally, information about what to display on certain date is kept in an array of BinsDay objects that contain date and an array of strings representing the bins:
1
2
3
4
5
public class BinsDay
{
    public DateTime Day { get; set; }
    public string[] Bins { get; set; }
}
When parser finds “calendar event” corresponding to a bin (or multiple bins) collection at some date, items in the Bins array in corresponding BinsDay object are updated:
1
2
3
4
5
6
7
8
9
10
11
12
13
14
public BinsSchedule ParseContent(Stream contentStream)
{
    var parser = new Parser();
    var days = new ArrayList();
    using (var reader = new StreamReader(contentStream))
    {
        parser.Parse(reader, e => AddBinsForDay(
		days, e.DtStart, GetBinsFromSummary(e.Summary)));
    }

    AddEmptyDays(days, _timeProvider.Now.Date);

    return new BinsSchedule { Days = (BinsDay[])days.ToArray(typeof(BinsDay)) };
}
Because multiple bins on a day might be represented as single “calendar event” or separate “calendar events”, the logic needs to either add new BinsDay, or add an item to Bins array in existing BinsDay:
1
2
3
4
5
6
7
8
9
10
11
12
13
14
15
16
private void AddBinsForDay(ArrayList days, DateTime date, string[] bins)
{
    foreach (BinsDay day in days)
    {
        if (day.Day == date)
        {
            var newBins = new string[day.Bins.Length + bins.Length];
            day.Bins.CopyTo(newBins, 0);
            bins.CopyTo(newBins, day.Bins.Length);
            day.Bins = newBins;
            return;
        }
    }

    days.Add(new BinsDay { Day = date, Bins = bins });
}
Note the linear search foreach-ing items in ArrayList, because no LINQ support in nanoFramework 😉
Lastly, we need to fill in the “blanks” (days in the array with no bins collection) between today and the latest date in the array, so that display logic will not report missing data on those days:
1
2
3
4
5
6
7
8
9
10
11
12
13
14
public void AddEmptyDays(ArrayList days, DateTime today)
{
    DateTime lastDay = today;
    for (int i = 0; i < days.Count; i++)
    {
        var day = (BinsDay)days[i];
        while (lastDay.Date < day.Day.Date)
        {
            days.Insert(i,
		new BinsDay { Day = lastDay, Bins = new string[0]});
            lastDay = lastDay.AddDays(1);
        }
    }
}
The last piece of this service was display logic. First, we need to ensure that we have valid system time (that means device has connected to network and time has been updated). Then get local time in the configured time zone and decide whether to display bin colour(s) for today or tomorrow. If data for given date is missing, schedule needs to be updated:
1
2
3
4
5
6
7
8
9
10
11
12
13
14
15
16
17
18
19
20
21
22
23
24
25
26
27
28
29
30
31
32
33
34
35
36
37
38
39
40
41
42
43
44
45
46
public void ShowSchedule()
{
    if (!_hasValidTime)
    {
        if (!_networkProvider.IsConnected)
        {
            _networkProvider.Connect();
            if (!_networkProvider.IsConnected)
                throw new Exception("Could not connect to network");
            _hasValidTime = true;
        }
    }

    if (_hasValidTime)
    {
        var localTime = _timeProvider.Now;
        if (localTime.Hour < 12)
        {
            var bins = GetBinsForDate(localTime);
            if (bins != null)
            {
                _displayController.DisplayTodaysBins(
			bins.ToColorsArray());
                return;
            }
            _logger.LogError("No data for today");
        }
        else
        {
            var bins = GetBinsForDate(localTime.AddDays(1));
            if (bins != null)
            {
                _displayController.DisplayTomorrowsBins(
			bins.ToColorsArray());
                return;
            }
            _logger.LogError("No data for tomorrow");
        }
    }
    else
    {
        _logger.LogError("Current date/time not available");
    }

    _displayController.DisplayError();
}
And if anything goes wrong, indicate an error, so user can take an action instead of missing their garbage truck!
Scheduler, Configuration, Logging and DI
There are pieces I could live without, but I do not want to 😊. MAKO IoT Scheduler does exactly what its name suggests - perfect for my use case! All I needed to do was to implement ITask interface, which triggers the ShowSchedule method on BinsScheduleService:
1
2
3
4
5
6
7
8
9
10
11
12
13
14
15
16
17
public class ShowBinsScheduleTask : ITask
{
    private readonly IBinsScheduleService _binsScheduleService;

    public string Id { get; }

    public ShowBinsScheduleTask(IBinsScheduleService binsScheduleService)
    {
        Id = nameof(ShowBinsScheduleTask);
        _binsScheduleService = binsScheduleService;
    }

    public void Execute()
    {
        _binsScheduleService.ShowSchedule();
    }
}
Configuration library makes it easy to write settings to non-volatile memory and access it from code as a strongly-typed object. Logging library uses nanoFrameowork’s ILogger interface and provides configurable logger with console output as default. NanoFramework’s Dependency Injection library allows to wire up everything in a flexible way, separate for application and unit tests.
The Tests
I value Test-Driven Development approach a lot. However, in “discovery development mode” I prefer using tests as an accompanying tool that enables me to quickly verify pieces of code, instead of writing test upfront as TDD teaches. My code’s structure changes many times until it reaches final state and tests need to follow that. Rather than striving for meeting metrics like code coverage and rigorously following test pyramid I reach to the test toolbox for unit, component or integration tests depending on my current need. Sometimes the purpose is to check how not-so-well-documented library works and a piece of code executed within Unit Test framework, with console output instead of Assert(s) does the trick (this is not what I would call a test anyway and it gets deleted once I figure out what I wanted 😉). Unit tests are also invaluable when it comes to verifying behaviour on edge cases. “Am I sure this range should be inclusive?”, “What happens if this is null?” – such tests are often must-have!
As I mentioned before, nanoFramework comes with test framework, which seamlessly integrates with Visual Studio. You can run your tests without hardware, on development machine or CI. There is although one thing to bear in mind: the logic under test must be in a separate project (assembly) than your program’s entry point. In other words, if you try running tests on nanoFramework project which contains Program class with Main method, that is what will get executed instead of the tests. For this reason MAKO IoT README suggest structuring your code as two separate projects: one with hardware-agnostic logic and the second with hardware-specific pieces, wire-up and entry point.
One thing that I miss the most is a mocking framework, like Moq or NSubstitute. In nanoFramework you must implement mocks as concrete classes. So far there is no way around it.
Hardware Services
Having verified “dry” logic with tests I put my hands on hardware-specific components. I needed RGB LED driver, which communicates with ESP32’s PWM pins to set given colour. The LED library already provided IPixelDriver interface for it.
RGB LEDs come in two major types: common anode or common cathode. For common anode the greater value of PWM duty cycle the brighter the colour will be. For common cathode it is the opposite. Also, colours of LEDs from different manufacturers may look quite different, so ability to fine-tune R, G and B values would be most welcome. That all was implemented in PwmPixelDriver with inverse flag and three calibration factors:
1
2
3
4
5
6
7
8
9
10
11
12
public void SetPixel(Color color)
{
    SetValue(_rChannel, color.R * RFactor);
    SetValue(_gChannel, color.G * GFactor);
    SetValue(_bChannel, color.B * BFactor);
}

private void SetValue(PwmChannel channel, double value)
{
    double dc = value / (double)255;
    channel.DutyCycle = _inverse ? 1 - dc : dc;
}
Putting everything together
When it comes to composition, Dependency Injection is truly invaluable. MAKO IoT goes even further with Device composition library. IT employs fluent builder pattern to compose and configure components. We start with creating a DeviceBuilder. Then we register services in DI:
1
2
3
4
5
6
7
8
9
10
11
12
13
14
15
DeviceBuilder.Create()
    .ConfigureDI(services =>
    {
        services.AddSingleton(typeof(IBinsScheduleService),
		typeof(BinsScheduleService));
        services.AddSingleton(typeof(IDisplayController),
		typeof(DisplayController));
        services.AddSingleton(typeof(IDateTimeProvider),
		typeof(DateTimeProvider));

        //Set R,G,B pins here. Fine tune LED color with calibration factors.
        //Values going to RGB pins are multiplied by corresponding factor.
        services.AddSingleton(typeof(IPixelDriver),
		new PwmPixelDriver(27, 26, 25, true));
     })
Next, we add logging, Wi-Fi, and storage:
1
2
3
4
5
6
7
#if DEBUG
    .AddLogging(new LoggerConfig(LogLevel.Debug))
#else
    .AddLogging(new LoggerConfig(LogLevel.Information))
#endif
    .AddWiFi()
    .AddFileStorage()
Next, we add scheduler with our task:
1
2
3
4
5
.AddScheduler(options =>
{
    options.AddTask(typeof(ShowBinsScheduleTask),
	nameof(ShowBinsScheduleTask));
})
… and configuration with default values:
1
2
3
4
5
6
7
8
9
10
11
12
13
14
15
16
17
18
19
20
21
22
23
24
25
26
27
28
29
30
31
32
.AddConfiguration(cfg =>
{
    cfg.WriteDefault(SchedulerConfig.SectionName, new SchedulerConfig
    {
        Tasks = new[] {
            new SchedulerTaskConfig { TaskId = nameof(ShowBinsScheduleTask),
		IntervalMs = 30000 }}
    });

    cfg.WriteDefault(WiFiConfig.SectionName, new WiFiConfig
    {
        Ssid = "MyIoTWiFi",
        Password = "ThisIsSecret!"
    });

    cfg.WriteDefault(WasteBinsCalendarConfig.SectionName,
	new WasteBinsCalendarConfig
    {
        Timezone = "CET-1CEST,M3.5.0,M10.5.0/3",
        BinsNames = new()
        {
            { "mixed", "Black" },
            { "BIO", "Brown" },
            { "plastic", "Yellow" },
            { "glass", "Green" },
            { "paper", "Blue" },
        },
	CalendarUrl = "https://api.trashcompany.com/schedule",
	ServiceCertificate = ""

    });
})
Finally, we build and start the device:
1
2
.Build()
.Start();
Let’s take closer look at the configuration. MAKO IoT Configuration library serializes config classes and saves them onto device internal flash storage (NVM). Whatever is specified in WriteDefault method is getting saved on device start. In WasteBinsCalendarConfig we set time zone as POSIX string and mapping between strings used in iCalendar events and colour names. We also need URL to download garbage collection schedule from and, provided it is exposed through HTTPS (most certainly is), certificate to authenticate this URL’s domain.
Make it look nice!
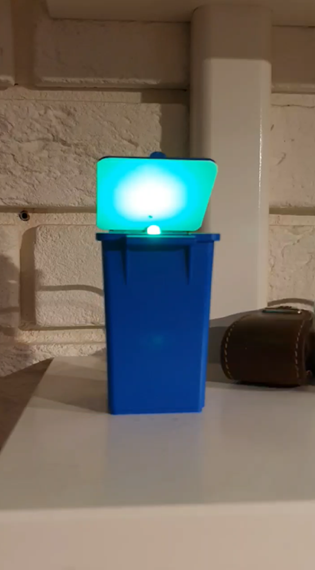
Aesthetics is a subjective matter. Personally, I was very unsatisfied with a solderless breadboard and bunch of wires 😊. The device should nicely fit onto our kitchen shelf and its outside look would ideally give a hint about the device’s purpose. Housing should fit ESP32 DevKit and expose light from LED but not too directly. Solution came unexpectedly from toys spare parts category. Plastic trash bin for a toy garbage truck turned out to fit the DevKit. With a little bit of preschool-type artwork the LED light was nicely glowing from underneath bin’s lid! 😊
Final thoughts
And there I have it: little blue trash bin standing on my kitchen shelf, blinking colours whenever garbage collection is coming. Every family member can see it and immediately know what to do. We never miss garbage truck again!
Can this project make it to an off-the-shelf product? Well, there are several missing pieces of functionality, critical from consumer point of view. There is no way to update configuration other than code re-deployment. Software update requires USB connection – no ability to do this over the network (over-the-air update is presumably the most wanted feature in nanoFramework now 😉). Garbage collection companies around the world may expose their schedules in different formats. So, for today the answer is no, but there is a potential! As MAKO IoT and nanoFramework development progresses and new features will be available!